Reflection
Introduction
This is a reflection on the work of the final assignment project, the custom tank CB550 Andrew Wallace. I will be critically reviewing it using images, video, text and drawings to reveal strengths, weaknesses and alternatives to your approach, techniques and tools.
Final Project


Our group consist of 7 people have chosen the custom tank CB550 Andrew Wallace. It has a unique shape from from top to bottom which has multiple curvature from both left and right side which considered on of the major challenges in this assignment. This is the final project of how our group had crated the custom tank CB550 Andrew Wallace.
Strengths and Weakness
There are two part of the assignment which shows both the strengths and weakness respectively of this project. The Strengths of this project would be the metal shaping while the weakness is the software usage within this project which is the Model making.
Model Making - Software - Weakness
This is the beginning part of the project where you have to use photogrammetry or Rhino/Grasshopper techniques to create a 3D model of your chosen fuel tank. Photogrammetry is the use of photography in surveying and mapping to ascertain measurements between objects. This was not use as we did not take any photos of the existing tank which mean we have to use Rhino/Grasshopper. Rhino 6 can create, edit, analyse, document, render, animate, and translate curves, surfaces, and solids, point clouds, and polygon meshes. This is use to show the 3D image of the custom tank. Grasshopper is a graphical algorithm editor tightly integrated with Rhino's 3-D modelling tools. This took a lot of time as none of the teammate know how to use the program so we have to ask for help with Russel for assisting our group on the features and usage of the program. After using Rhino/Grasshopper, use Autodesk Slicer for Fusion 360 to prepare your fuel tank template for laser cutting or CNC machining. This is for laser cutting later with the laser cutting machine for assembling our model later. This also took a lot of time on the use of laser cutting machine since we didn't know the time-frame restriction and material suitability for the project too a lot of time which is a lesson for us when using the machine in the future. Not just the laser cutting machine but also learning the Rhino/Grasshopper does help with future use in the construction industry.


 Metal-Shaping - Construction - Strengths
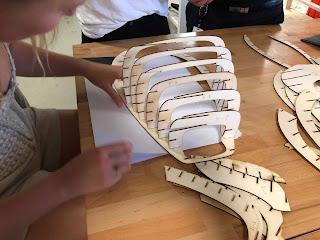
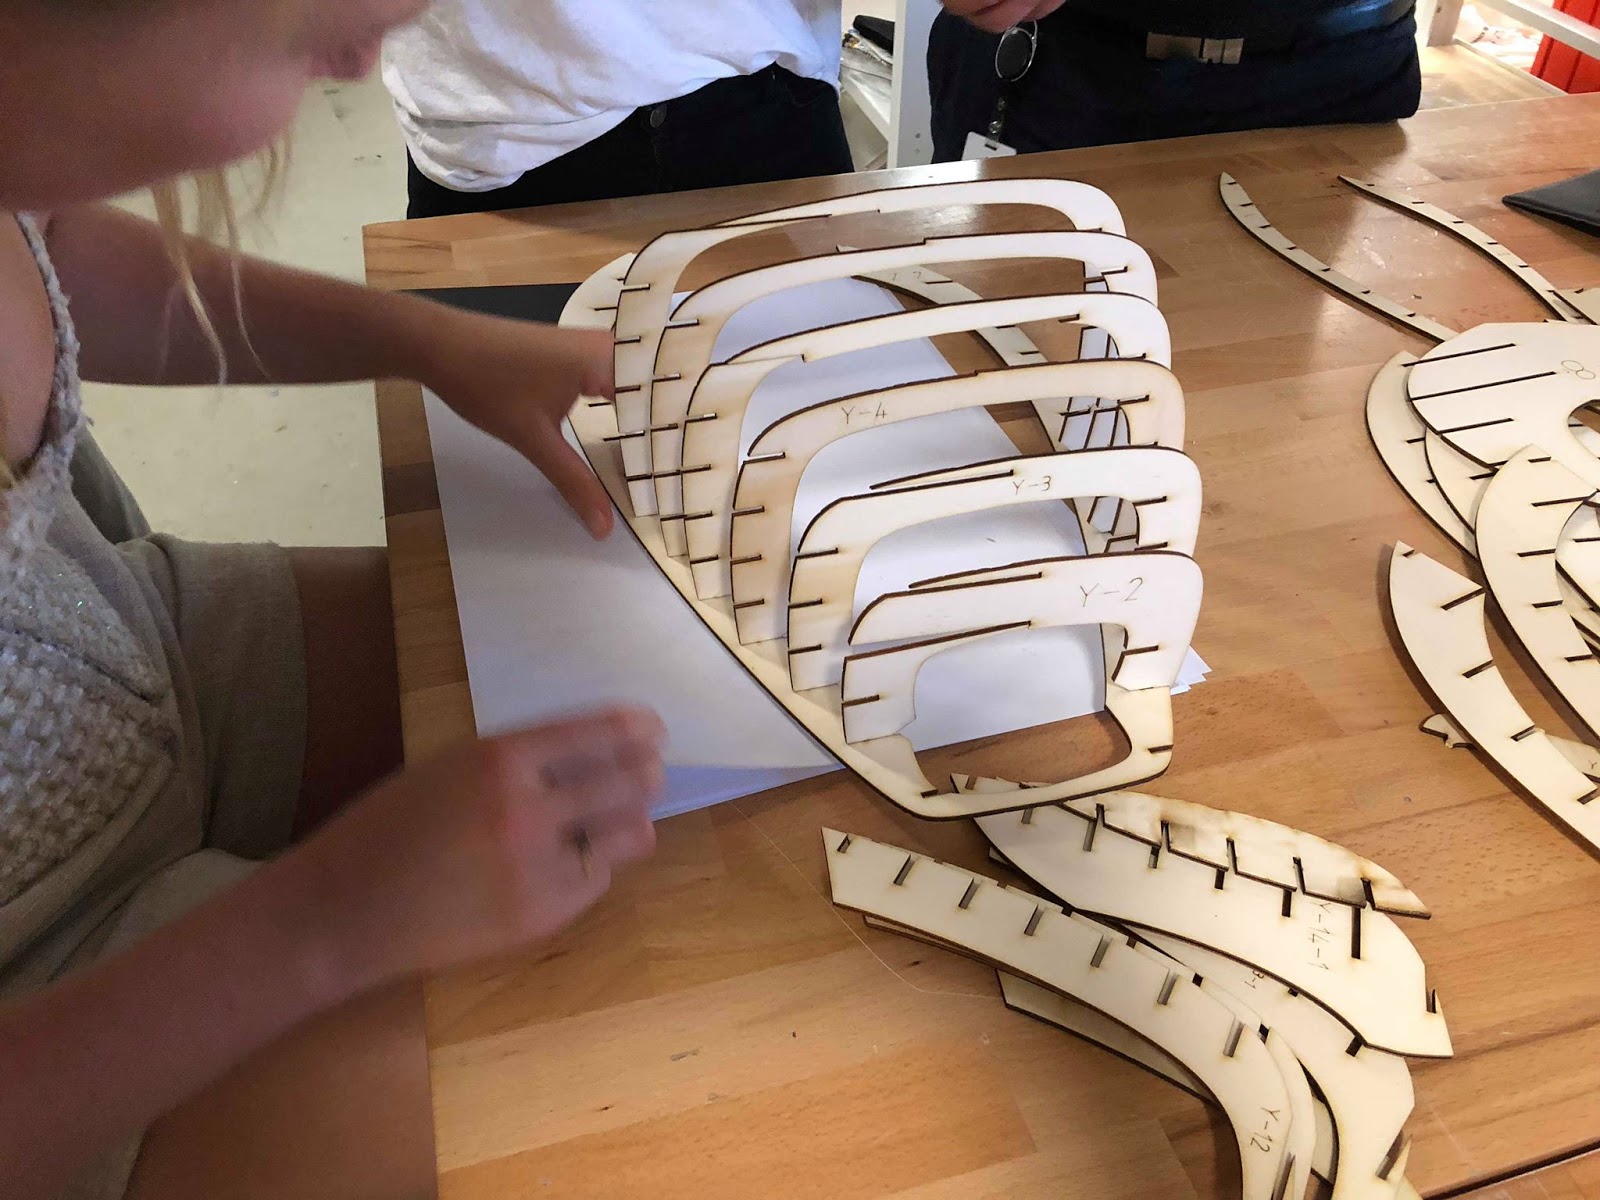
Before the metal-shaping starts, we had laser-cutted pieces of the model and assemble the pieces to allow have a skin later within the project to use it for pattern-making. Here is the result of the assembly and skin making.


Metal-Shaping considers various of steps which had lead to the final result from the beginning of this report. The steps considered:
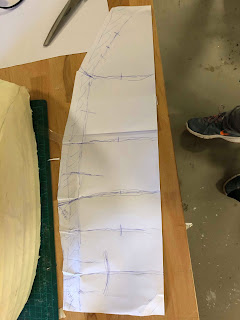
- Pattern- Making + Marking Out: Pattern-making is one of the easy steps to do within the project. It is using 2 A3 paper to mark the piece I picked or been allocated by my team and mark out the shape outline and also curvature points to know where is the major and minor curve of the project. In this project, I used a radius gauge to mark out which angle it is that has a major and minor curve. After that, draw it on the metal sheet.


- Cutting: Cutting is also an easy part to do within a project as it is cutting the metal sheets no-use area which is not needed within the project. This is then cutted using a hand-lever cutter and a sniper if needed.

- Shrinking and Stretching: This technique is use to stretch and shrink the metal at will using the shrinker and strecher. Shrinking is pushing the metal together to bend the metal outwards and give it a nice curve from the exterior while the stretching is pushing the metal away from each other and expand and stretch out the metal to flatten it more. I use this in my project to make major curvature from the marked areas on the metal sheet and experiment to get the right curvature.


- Planishing: This technique i had use while creating my part, the curvature within the side of the custom tank is a huge curve which the English Wheel can be use within the project. The English Wheel is a use of a hammer and dolly to planish the lumpy shape of the metal material. This will smoothing and flatten it.


- Strategic Hitting: Sometimes, when the English Wheel and Shrinker/Stretcher is not available or cannot achieve the result needed, it is possible to hammer the edge or inside with strategic hitting using a mallet or blunt hammer to get the right curvature. I have to use the mallet to hit the top bit and push the top rim of the side tank to touch the model side of the tank.


- Rolling and Bead-Rolling: Planishing can be easily achieve by another way which is rolling the metal using a roller. A roller is using 3 cylinders in a triangle and allows to adjust the height of the cylinders of the back to change the curvature of the metal sheet. I have use this to change back and forth to get and achieve the right curvature. Bead Roller is use for connectivity for another metal sheet. This needs to be done only for the final result to achieve a line lump on top of the metal. But this wasn't needed, as the part is suppose to match the same shape as the custom tank shape.


 Conculsion
I have learnt a lot of techniques, tools and software in this course and it had improve my knowledge of easier ways that can be use within the real world. Each class and lesson is interesting and I have realise the importance of of my strengths and weakness of both practical working and software working respectively which each has important lesson for them. Through multiple preparation, teamwork and communication with group members, tutors and self-learning, the final work of this assignment was exciting and high achieve exceeding my expectations.
This is a reflection on the work of the final assignment project, the custom tank CB550 Andrew Wallace. I will be critically reviewing it using images, video, text and drawings to reveal strengths, weaknesses and alternatives to your approach, techniques and tools.
Final Project


Our group consist of 7 people have chosen the custom tank CB550 Andrew Wallace. It has a unique shape from from top to bottom which has multiple curvature from both left and right side which considered on of the major challenges in this assignment. This is the final project of how our group had crated the custom tank CB550 Andrew Wallace.
Strengths and Weakness
There are two part of the assignment which shows both the strengths and weakness respectively of this project. The Strengths of this project would be the metal shaping while the weakness is the software usage within this project which is the Model making.
Model Making - Software - Weakness
This is the beginning part of the project where you have to use photogrammetry or Rhino/Grasshopper techniques to create a 3D model of your chosen fuel tank. Photogrammetry is the use of photography in surveying and mapping to ascertain measurements between objects. This was not use as we did not take any photos of the existing tank which mean we have to use Rhino/Grasshopper. Rhino 6 can create, edit, analyse, document, render, animate, and translate curves, surfaces, and solids, point clouds, and polygon meshes. This is use to show the 3D image of the custom tank. Grasshopper is a graphical algorithm editor tightly integrated with Rhino's 3-D modelling tools. This took a lot of time as none of the teammate know how to use the program so we have to ask for help with Russel for assisting our group on the features and usage of the program. After using Rhino/Grasshopper, use Autodesk Slicer for Fusion 360 to prepare your fuel tank template for laser cutting or CNC machining. This is for laser cutting later with the laser cutting machine for assembling our model later. This also took a lot of time on the use of laser cutting machine since we didn't know the time-frame restriction and material suitability for the project too a lot of time which is a lesson for us when using the machine in the future. Not just the laser cutting machine but also learning the Rhino/Grasshopper does help with future use in the construction industry.


Before the metal-shaping starts, we had laser-cutted pieces of the model and assemble the pieces to allow have a skin later within the project to use it for pattern-making. Here is the result of the assembly and skin making.


Metal-Shaping considers various of steps which had lead to the final result from the beginning of this report. The steps considered:
- Pattern- Making + Marking Out: Pattern-making is one of the easy steps to do within the project. It is using 2 A3 paper to mark the piece I picked or been allocated by my team and mark out the shape outline and also curvature points to know where is the major and minor curve of the project. In this project, I used a radius gauge to mark out which angle it is that has a major and minor curve. After that, draw it on the metal sheet.


- Cutting: Cutting is also an easy part to do within a project as it is cutting the metal sheets no-use area which is not needed within the project. This is then cutted using a hand-lever cutter and a sniper if needed.

- Shrinking and Stretching: This technique is use to stretch and shrink the metal at will using the shrinker and strecher. Shrinking is pushing the metal together to bend the metal outwards and give it a nice curve from the exterior while the stretching is pushing the metal away from each other and expand and stretch out the metal to flatten it more. I use this in my project to make major curvature from the marked areas on the metal sheet and experiment to get the right curvature.


- Strategic Hitting: Sometimes, when the English Wheel and Shrinker/Stretcher is not available or cannot achieve the result needed, it is possible to hammer the edge or inside with strategic hitting using a mallet or blunt hammer to get the right curvature. I have to use the mallet to hit the top bit and push the top rim of the side tank to touch the model side of the tank.


- Rolling and Bead-Rolling: Planishing can be easily achieve by another way which is rolling the metal using a roller. A roller is using 3 cylinders in a triangle and allows to adjust the height of the cylinders of the back to change the curvature of the metal sheet. I have use this to change back and forth to get and achieve the right curvature. Bead Roller is use for connectivity for another metal sheet. This needs to be done only for the final result to achieve a line lump on top of the metal. But this wasn't needed, as the part is suppose to match the same shape as the custom tank shape.


I have learnt a lot of techniques, tools and software in this course and it had improve my knowledge of easier ways that can be use within the real world. Each class and lesson is interesting and I have realise the importance of of my strengths and weakness of both practical working and software working respectively which each has important lesson for them. Through multiple preparation, teamwork and communication with group members, tutors and self-learning, the final work of this assignment was exciting and high achieve exceeding my expectations.


Comments
Post a Comment